
Menu


Insert the channel liner into the largest hole at the rear of your slide. Press it in as far as it will go by hand. Then using a channel liner install tool, or a punch that is the same diameter as the channel liner, press the channel liner further into the channel until it’s seated at the bottom.
Be careful not to press too hard to damage or crumple the edge of the liner. It shouldn’t take too much force to install the channel liner.


Take the firing pin safety and insert the spring into the cup underneath the firing pin safety. Turn the Slide and insert the firing pin safety and spring into the hole underneath the slide. After installing the safety plunger and spring, press down on the safety spring and slide the extractor into place.


Slide the polymer retainer into place over the firing pin

Slide the spring over the firing pin.
Pressing the spring downwards out of the way, set the two retainer clips into their spots. If placed correctly, they’ll hold the firing pin spring in place.
If you’re having trouble installing the retainer clips; we’ve found it’s easier to place the back of the firing pin on the end of an Allen key, punch, or small screwdriver so that you can compress the firing pin spring with one hand and drop the retainer clips into place with the other.


The smaller hole next the the large main hole where you installed the sleeve houses the Extractor Depressor Plunger, Extractor Depressor Spring, and Spring Bearing.
Before inserting those parts into that channel, you’ll need to stack them all together. Slide the spring over the nub on the depressor plunger, then insert the spring bearing into the other end of the spring like in the photo below.
Insert the plunger assembly into that smaller channel with the spring end pointing toward the back plate like in the photo.


Next, take your Firing Pin/Striker Assembly that you previously put together, and slide it into place in the larger channel next to your plunger assembly.


Once you have all the smaller internal parts installed, you can slide your backplate on to hold your striker assembly and plunger assembly in place.
To install your backplate you’ll need to slide it into place from the bottom of your slide with the serrations facing outwards or towards you. You’ll need to press down first on your firing pin sleeve while pushing upwards on the back plate. Then once you get the back plate over the firing pin sleeve, you will then depress the plunger, and continue pressing the backplate up until it clicks into place.
When trying to get the backplate into place, a good tip is to use an allen key a punch to press down on the sleeve and plunger with one hand while pushing up on the bottom of the backplate with the other like in the photos below.


Installing your iron sights or even your red dot if you have an RMR cut slide can be done before or after all the above steps.
Many builders have different preferred methods of installing your rear sight. But two main methods are the most popular among hobbyists. The first installation method is by using a rear sight pusher tool. This one is recommended by gunsmiths and manufacturers and is recommended for use for both polymer and metal rear sights. Using a sight pusher tool, you simply tighten the slide into the vise, put the rear sight into place, and turn the block to the right or the left and it will press the rear sight into place until its perfectly centered.
The second method if you don’t have a rear sight pusher tool handy, using a soft non-marking mallet can get the job done if done properly. Like the sight pusher tool. Gently tap the rear sight into place being careful not to bend, or scratch your sight or slide. Make sure you are using a solid non-marking surface.


Standard front sights are screwed into place using a front sight tool or socket small enough to tighten the bottom screw, apply your preferred thread locker (a blue thread locker is normally recommended) and thread the front sight into place and tighten. Be careful not to strip your threads or overtighten the front sight.
.jpg)

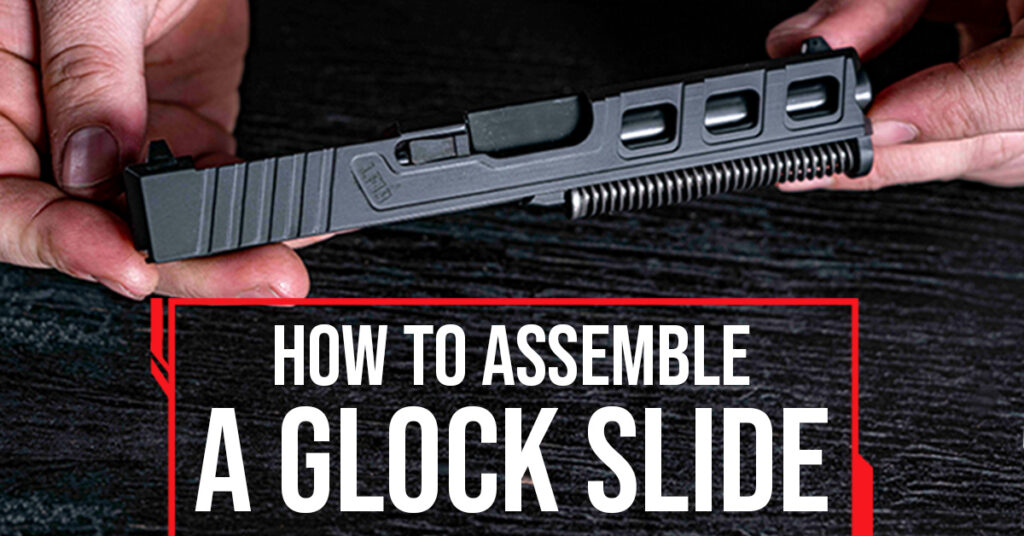
You’re basically all there! If you’ve ever field-stripped a Glock Slide for cleaning or upgrades then you can skip this step. But for those who have never installed a Glock Barrel, you’ll find it’s really easy.
Turn the slide and barrel so the bottom is facing upwards. Slide the front of the barrel at an angle into the inside of the front slide opening. Feed it through until the barrel drops into place.

Press the front of the spring into its place on the inside front of the slide, then while compressing the spring a bit with your hand, set the recoil spring onto the second shelf on the bottom of your barrel so that the recoil spring assembly sits perfectly level.


At this point, you should have a complete Glock Compatible slide for your next build. These build steps can be applied to Gen 1-4 Glock 17 and Glock 19 compatible slide assemblies.
Remember, for most aftermarket Glock-compatible slide assemblies, there normally is a break-in period for your slide to run smoothly. Apply lubricant to the rail channels and rack the slide repeatedly. Many builders like to run 100 rounds or more through their firearm while keeping it lubricated to make sure everything starts to cycle properly.
If putting your own complete slide together isn’t something you want to do, then don’t stress! We’ve got dozens of different custom complete slides ready to ship straight to your door, you can select to have them pre-assembled for you, or you can use the kit to put one together yourself. Those can be found HERE